
Build Production RESTful API with AWS
A complete walkthrough of creating a secure, scalable RESTful API using AWS Lambda, API Gateway, and Cognito authentication. Learn how to bridge your web app with backend services using modern cloud architecture.
August 29, 2025

Introduction
Building a RESTful API that scales, handles authentication, and integrates seamlessly with your web application doesn’t have to be overwhelming. After several projects that needed robust backend APIs, I’ve developed a reliable approach using AWS services that gets you from zero to production-ready systematically.
This deep-dive walks you through creating what I call an “API bridge” – a complete serverless architecture connecting your frontend to backend logic. We’ll use AWS Lambda for business logic, API Gateway for routing, and Cognito for secure authentication. By the end, you’ll have a fully functional API running on your custom domain with proper CORS handling and JWT-based security.
These are the exact steps I use for production applications. I’ve made the mistakes so you don’t have to.
The Architecture Overview
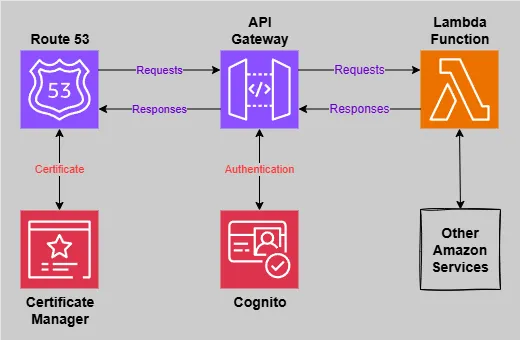
Before we dive into implementation, let’s understand what we’re building:
- AWS Lambda: Handles your API logic without managing servers
- API Gateway: Routes HTTP requests and manages CORS
- Amazon Cognito: Provides JWT-based authentication
- Route 53 + ACM: Custom domain with SSL certificates
Step-by-Step Implementation
1. Create Your First Lambda Function
Let’s start with the foundation – a Lambda function that will handle our API requests. This function will serve as our backend logic processor.
Steps:
- Navigate to the AWS Console and open Lambda
- Click “Create function” and choose “Author from scratch”
- Select Python 3.x as your runtime (you can adapt this to Node.js or other languages later)
- Create a basic function that returns mock data
Here’s the initial Lambda function I use for testing:
import json
import logging

# Set up logging
logger = logging.getLogger()
logger.setLevel(logging.INFO)

def lambda_handler(event, context):
    """Handle API Gateway requests and return mock resource data"""

    try:
        # Log the incoming request for debugging
        logger.info(f"Received event: {json.dumps(event)}")

        # Mock data - in production, this would come from a database
        mock_resources = [
            {"id": 1, "name": "Ava", "age": 27, "city": "Seattle","isActive": True},
            {"id": 2, "name": "Liam", "age": 34, "city": "Denver", "isActive": False},
            {"id": 3, "name": "Maya", "age": 22, "city": "Austin", "isActive": True},
        ]

        return {
            'statusCode': 200,
            'headers': {
                'Content-Type': 'application/json',
            },
            'body': json.dumps({
                'success': True,
                'resources': mock_resources,
                'count': len(mock_resources)
            })
        }

    except Exception as e:
        logger.error(f"Error processing request: {str(e)}")
        return {
            'statusCode': 500,
            'headers': {'Content-Type': 'application/json'},
            'body': json.dumps({
                'success': False,
                'error': 'Internal server error'
            })
        }
2. Configure API Gateway for Maximum Flexibility
API Gateway will be the front door to your Lambda function. I prefer HTTP APIs over REST APIs for most use cases – they’re faster, cheaper, and simpler to configure.
Steps:
- Open API Gateway in the AWS Console
- Click “Create API” and select “HTTP API”
- Choose “Build” (not “Import”)
- Add your Lambda function as an integration
- Review and create.
Route Configuration:
Here’s where many tutorials get it wrong. You need to set up routes carefully to handle both CORS and authentication properly.
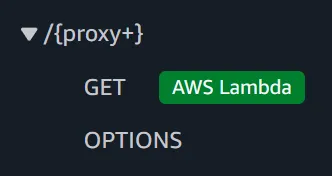
Create these routes:
/{proxy+}for all your API endpoints/if you want to handle root requests
For each route, add these methods:
GET,POST,PUT,DELETE(connect these to your Lambda)OPTIONS(leave this unconnected – API Gateway handles it automatically)
Critical CORS Configuration:
This is where many tutorials fail. Set up CORS properly from the start:
Access-Control-Allow-Origin: *
Access-Control-Allow-Headers: authorization, content-type
Access-Control-Allow-Methods: GET, POST, PUT, DELETE
Why I avoid the ANY method: When you add authentication later, ANY requires auth on OPTIONS requests, breaking CORS preflight checks. Amazon kept either trying to make my OPTIONS command secure (which doesn’t work), or sending OPTIONS requests to my Lambda function. My Lambda function doesn’t handle OPTIONS – I want to separate concerns. Amazon does a good job handling CORS requests, so let it. Let your Lambda function focus on API implementation.
3. First API Test – Verify the Foundation
Time for the moment of truth. Let’s make sure our Lambda and API Gateway are talking to each other properly.
Find your API endpoint:
- In API Gateway, go to your HTTP API
- Look for the “Invoke URL” in the API details
- It will look like:
https://abc123def.execute-api.us-east-1.amazonaws.com
Test with curl:
# Test a basic endpoint
curl https://your-api-id.execute-api.your-region.amazonaws.com/resources

# Test with verbose output to see headers
curl -v https://your-api-id.execute-api.your-region.amazonaws.com/resources
Expected response:
{
  "success": true,
  "resources": [
    { "id": 1, "name": "Ava", "age": 27, "city": "Seattle", "isActive": true },
    { "id": 2, "name": "Liam", "age": 34, "city": "Denver", "isActive": false },
    { "id": 3, "name": "Maya", "age": 22, "city": "Austin", "isActive": true }
  ],
  "count": 3
}
Troubleshooting common issues:
- 502 Bad Gateway: Check your Lambda function logs in CloudWatch
- CORS errors: Verify your CORS configuration in API Gateway
- 404 errors: Make sure your route includes
/{proxy+}
Try this yourself with your own API endpoint – seeing that first successful response is always satisfying!
4. Professional Touch – Custom Domain Setup
Using AWS’s default API Gateway URLs works for testing, but for production, you want your own branded domain. This also makes it easier to migrate or change your backend architecture later.
Why I use subdomains: api.yourdomain.com is clean, professional, and clearly separates your API from your main website. It also makes SSL certificate management simpler.
Certificate Setup:
- Navigate to AWS Certificate Manager (ACM)
- Click “Request a certificate”
- Choose “Request a public certificate”
- Enter your subdomain:
api.yourdomain.com - Choose DNS validation (easier if your domain is already in Route 53)
- Wait for validation to complete
Connect to API Gateway:
- In API Gateway, go to “Custom domain names”
- Click “Add domain name”
- Enter your subdomain name
- Select your ACM certificate
- Create the domain mapping to your API
Pro tip: If you’re managing multiple environments (dev, staging, prod), consider using subdomains like api-dev.yourdomain.com and api.yourdomain.com. This makes environment management much cleaner.
5. DNS Configuration – Making It Live
Now we need to point your custom domain to your API Gateway. Route 53 makes this straightforward with alias records.
Steps:
- Open Route 53 in the AWS Console
- Navigate to your hosted zone (your domain)
- Click “Create record”
- Configure the record:
- Record name:
api(for api.yourdomain.com) - Record type:
A - Alias: Yes
- Route traffic to: API Gateway API
- Region: Your API’s region
- API: Select your API Gateway domain name.
Found under Custom domain names →api.yourdomain.com→ Endpoint configuration.
- Record name:
Why use an alias record instead of CNAME? Alias records are free, faster, and work at the root domain level. They also automatically update if AWS changes the underlying IP addresses.
DNS propagation: Changes typically take 5-15 minutes to propagate, but can take up to 48 hours globally. You can check propagation status using tools like dig or online DNS checkers.
# Check if your DNS is working
dig api.yourdomain.com
6. Custom Domain Verification
Test your professional setup where everything comes together.
Test your custom domain:
# Basic functionality
curl https://api.yourdomain.com/resources

# Verify HTTPS certificate
curl -I https://api.yourdomain.com/resources

# Check CORS headers
curl -H "Origin: https://yourdomain.com" \
     -H "Access-Control-Request-Method: GET" \
     -H "Access-Control-Request-Headers: authorization" \
     -X OPTIONS \
     https://api.yourdomain.com/resources
Success indicators:
- ✅ 200 status code
- ✅ Valid SSL certificate
- ✅ Proper CORS headers in OPTIONS response
- ✅ Same JSON response as before
If something’s not working: Check CloudWatch logs for your Lambda function, verify your custom domain mapping in API Gateway, or confirm DNS propagation with nslookup api.yourdomain.com.
Once this passes, you have a fully functional, professionally hosted API. Security comes next.
7. Securing Your API with JWT Authentication
An unsecured API is like leaving your front door wide open. Let’s add proper authentication using Amazon Cognito and JWT tokens.
Prerequisites: You’ll need a Cognito User Pool set up. If you haven’t done this yet, check out my article on adding users to your website for the complete setup.
Create the JWT Authorizer:
- In API Gateway, go to “Authorization” → “Authorizers”
- Click “Create” and configure:
- Type: JWT
- Name:
CognitoJWTAuthorizer - Identity source:
$request.header.Authorization - Issuer URL:
https://cognito-idp.your-region.amazonaws.com/your-user-pool-id - Audience: Your Cognito App Client ID
Attach to Routes:
For each route (/ and /{proxy+}):
- Select the route
- For each method except OPTIONS:
- Click the method
- Under “Authorization”, select your JWT authorizer
- Leave OPTIONS without authorization (critical for CORS)
Why this approach works:
- JWT tokens are stateless and scalable
- Cognito handles token validation automatically
- API Gateway blocks unauthorized requests before they reach Lambda
- Your Lambda function can trust that requests are authenticated
Security best practices I follow:
- Use short-lived access tokens (1 hour)
- Implement refresh token rotation
- Log authentication failures for monitoring
- Consider rate limiting for additional protection
8. Final Testing – Authenticated Requests
Now for the ultimate test: making authenticated requests to your secured API.
Testing with curl:
First, you’ll need a valid JWT token from Cognito. You can get this from your web app’s developer tools or by implementing a simple login flow.
# Test without authentication (should fail)
curl https://api.yourdomain.com/resources
# Expected: 401 Unauthorized

# Test with valid JWT token
curl -H "Authorization: Bearer eyJhbGciOiJSUzI1NiIsInR5cCI6IkpXVCJ9..." \
     https://api.yourdomain.com/resources
# Expected: 200 OK with your resource data

# Test CORS with authentication
curl -H "Origin: https://yourdomain.com" \
     -H "Access-Control-Request-Method: GET" \
     -H "Access-Control-Request-Headers: authorization" \
     -X OPTIONS \
     https://api.yourdomain.com/resources
# Expected: 200 OK with CORS headers (no auth required)
Production-Ready React/Preact Component:
Here’s an improved version of the frontend component with proper error handling and loading states:
import { type Resource } from './Resource.ts'
import { useState, useEffect } from 'preact/hooks'
import { useAuth } from '../../hooks/useAuth.ts'

interface ResourceListProps {
  initialResources?: Resource[]
}

const API_BASE = import.meta.env.PUBLIC_API_BASE

export default function ResourceList({ initialResources = [] }: ResourceListProps) {
  const [resources, setResources] = useState<Resource[]>(initialResources)
  const [loading, setLoading] = useState(false)
  const [error, setError] = useState<string | null>(null)
  const { user, isAuthenticated } = useAuth()

  const fetchResources = async () => {
    if (!isAuthenticated || !user?.access_token) {
      setError('Authentication required')
      return
    }

    setLoading(true)
    setError(null)

    try {
      const response = await fetch(`${API_BASE}/resources`, {
        headers: {
          'Authorization': `Bearer ${user.access_token}`,
          'Content-Type': 'application/json',
        },
      })

      if (!response.ok) {
        throw new Error(`API request failed: ${response.status}`)
      }

      const data = await response.json()

      if (data.success) {
        setResources(data.resources || [])
      } else {
        throw new Error(data.error || 'Unknown API error')
      }
    } catch (err) {
      console.error('Failed to fetch resources:', err)
      setError(err instanceof Error ? err.message : 'Failed to load resources')
    } finally {
      setLoading(false)
    }
  }

  useEffect(() => {
    fetchResources()
  }, [isAuthenticated])

  if (!isAuthenticated) {
    return (
      <div className="auth-required">
        <p>Please log in to view resources.</p>
      </div>
    )
  }

  if (loading) {
    return <div className="loading">Loading resources...</div>
  }

  if (error) {
    return (
      <div className="error">
        <p>Error: {error}</p>
        <button onClick={fetchResources}>Retry</button>
      </div>
    )
  }

  return (
    <div className="resource-list">
      <h2>Resources ({resources.length})</h2>
      {resources.length === 0 ? (
        <p>No resources found.</p>
      ) : (
        <div className="resources">
          {resources.map((resource) => (
            <div key={resource.id} className="resource-card">
              <h3>{resource.name}</h3>
              <p>Age: {resource.age}</p>
              <p>City: {resource.city}</p>
              <span className={`status ${resource.isActive ? 'active' : 'inactive'}`}>
                {resource.isActive ? 'Active' : 'Inactive'}
              </span>
            </div>
          ))}
        </div>
      )}
    </div>
  )
}
What You’ve Built
You now have production-ready API infrastructure that many companies would be proud to run:
✅ Serverless Lambda function with proper error handling
✅ Professional API Gateway with correct CORS configuration
✅ Custom domain with SSL certificate
✅ DNS routing through Route 53
✅ JWT-based authentication with Cognito
✅ Frontend integration with error handling and loading states
This architecture gives you several key advantages: it automatically scales to handle traffic spikes, costs only what you use (typically $5-20/month for small to medium applications), includes built-in DDoS protection, and requires no server maintenance. You can extend it with database integration, full CRUD operations, rate limiting, and monitoring as your application grows.
Most importantly, you’ve built something solid – the same type of infrastructure that powers many successful web applications. The foundation is ready for your specific business logic and data models.
References and Further Reading
AWS Documentation:
- Building Lambda Functions with Python
- Building Lambda Functions with Node.js
- Building Lambda Functions with TypeScript
- API Gateway HTTP APIs
Best Practices: