
Getting Login Right with Cognito
My journey from auth hell to Amazon Cognito bliss. Here's how I built a login system that actually works - complete with all the gotchas I wish someone had warned me about.
August 16, 2025

You know that sinking feeling when you’re cruising along on a new project, everything’s clicking into place, and then you hit the authentication wall? Suddenly you’re staring down OAuth flows, password hashing algorithms, session management, and a laundry list of security considerations that make your head spin.
Authentication isn’t just another feature to bolt on - it’s the foundation that everything else depends on. Get it wrong, and you’re not just dealing with frustrated users; you’re potentially facing data breaches, compliance violations, and the kind of reputation damage that takes years to recover from.
After wrestling with several solutions and hitting more gotchas than I care to admit, I settled on Amazon Cognito. It’s not the prettiest option out there, but it handles the security heavy lifting so I can focus on building features that actually move the needle for users.
What We’re Building
Before we get lost in AWS console configurations, let’s establish what users will actually experience. Starting with the end goal keeps you grounded when you’re navigating through dozens of settings that all sound important but may not be.
1. Click “Sign In”
The user clicks a “Sign In” Button and the App shows a sign in dialog.
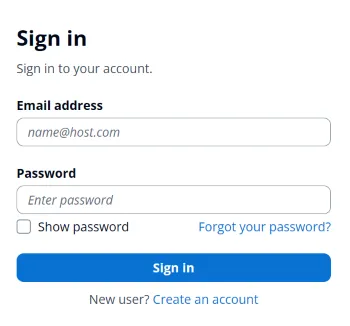
2. Click “Create an account”
The user clicks “Create an account” link and the App shows a sign up dialog.
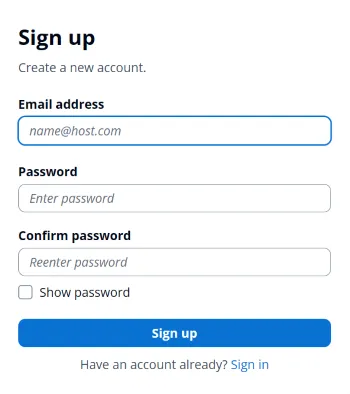
3. Enter Credentials
The user enters the credentials required to create an account and clicks “Sign up”. The app sends an email with a verification code and shows a confirmation dialog.
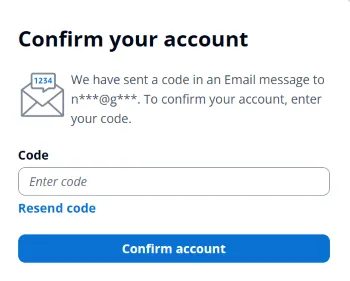
4. Verify Email
The user enters the verification code that they received by email to confirm their identity. Cognito creates a verified user account and logs them into the site.
These are Cognito’s Managed Login dialogs - functional but not exactly design-forward. You can customize the branding later, but I’ve learned to resist that urge early on. Get the authentication flow solid first, then worry about aesthetics.
Why I Chose Cognito
Honestly, my decision was already made - I wanted to learn AWS services, and Cognito is the authentication solution in that ecosystem. I understand there are simpler solutions out there, but my goal was AWS proficiency.
That said, Cognito brings real advantages:
- Security by default: Handles password policies, account lockouts, and threat detection without additional configuration
- Seamless AWS integration: If you’re using other AWS services, the IAM integration alone saves hours of setup
- Cost-effective scaling: Free tier covers 50,000 monthly active users, then pricing remains reasonable as you grow
- Enterprise-grade reliability: AWS runs their own services on this infrastructure
- Compliance ready: Built-in support for GDPR, HIPAA, and other regulatory requirements [Added for completeness - please review]
Fair warning: the AWS console learning curve is steep. It feels like piloting a spacecraft when you just want to drive to the store. But once you understand the core concepts, it becomes manageable.
Setting Up Cognito (The Fun Part… Sort Of)
Cognito has two main pieces you need to understand:
- User Pool: Think of this as your user database. All your users live here.
- App Client: This is how your specific app talks to the user pool. Each app gets its own client.
Cognito offers an overwhelming number of configuration options - seriously, it’s like they included every authentication feature ever conceived. I’m going to focus on the settings that actually matter for a working login system. I’ve been down every rabbit hole so you don’t have to.
Critical mindset: Start with the minimum viable configuration. Cognito’s advanced features are powerful, but they’re also where you’ll lose days tweaking settings that don’t impact your core user experience.
Creating Your User Pool
Alright, let’s create your user pool. Here are the settings that matter:
Application Type (Create user pool → Define your application): Single-Page Application (SPA)
This tells Cognito you’re building a client-side app. Whether you’re using React, Vue, vanilla JavaScript, or any other frontend framework, SPA is your choice.
Email Provider (Configure authentication methods → Email): Amazon SES
This is where things get… interesting. And by interesting, I mean this setting will likely cause you some debugging headaches. I’ll explain the gotcha in detail below.
Sign-In Options (Configure sign-in → Options for choice-based sign-in): Password only
This refers to alternative authentication methods like WebAuthn passkeys, email OTP, or SMS verification codes. Start with traditional password authentication - you can always add passwordless options later.
Self-Registration (Configure sign-up → Self-service sign-up): Enable self-registration
Let users create their own accounts. Manual user approval doesn’t scale and creates unnecessary friction for legitimate users.
Creating Your App Client
Now for the app client - this is where your app and Cognito shake hands.
Authentication Flows (Configure App client information): Check “Sign in with secure remote password” (ALLOW_USER_SRP_AUTH)
This enables Secure Remote Password protocol - your application never handles the actual password, only cryptographic proofs. This is crucial for security and compliance.
Callback URLs (Configure Login pages → Allowed callback URLs): https://localhost:4321/auth/popup-callback.html
Where Cognito redirects users after successful authentication. We’ll create this HTML file in your public directory later.
Sign-Out URLs (Configure Login pages → Allowed sign-out URLs): https://localhost:4321/auth/popup-logout.html
The destination after users log out. This ensures a clean session termination.
OAuth Grant Type (Configure Login pages → OAuth 2.0 grant types): Authorization Code Grant
The most secure OAuth flow for web applications. Avoid implicit grant - it’s deprecated in OAuth 2.1 for security reasons.
Scopes (Configure Login pages → OpenID Connect scopes): Email and OpenID
Minimal permissions - we need email for user identification and OpenID for the authentication protocol. You can add profile, phone, or custom scopes later if needed.
Important: Those localhost URLs are for development. You’ll need to add your production URLs later!
The Email Gotcha (This One Bit Me Hard)
This is where I burned an entire afternoon debugging what seemed like a perfectly configured system. Everything looked right, the signup flow completed without errors, but verification emails never arrived. Not in spam folders, not delayed - just gone.
The culprit? AWS takes email deliverability seriously. SES starts in “sandbox mode” where it can only send emails to pre-verified addresses. Your signup flow works perfectly, but only for email addresses you’ve manually verified in the SES console first.
I discovered this after testing with multiple email addresses and growing increasingly frustrated with what appeared to be a broken configuration.
Getting Out of Email Jail
To fix this, you need to request “production access” for SES. Here’s what I learned from going through this process:
Before you request:
- Verify at least one email address or domain in SES first. AWS wants to see you’re not just randomly requesting access.
- Have a plan for handling bounces and complaints. They will ask about this.
The request process:
- Be straightforward about your use case: “Building a web application that requires user email verification for account creation” is perfectly adequate.
- They’ll ask about bounce and complaint handling. A simple plan like “Monitor bounce rates via SES dashboard and implement automatic removal of invalid addresses” satisfies their requirements.
- Respond promptly to their follow-up email - they always send one requesting additional details about your sending practices.
- Include your expected sending volume and frequency in your initial request to avoid back-and-forth.
Timeline: AWS says 24-48 hours, but mine took about 3 business days. They’re thorough because they’re genuinely concerned about their platform being used for spam. The process is reasonable once you understand their perspective.
Once approved, you can send emails to any address. Game changer.
Alright! AWS setup is done. Time for the fun part - actually writing some code that works.
Grabbing Your Config Values
Time for a scavenger hunt in the AWS console. You need to find these values:
- Region: Whatever region you created everything in (like
us-east-1) - User Pool ID: In your user pool’s Overview tab - looks like
us-east-1_AbCdEfGhI - Domain: In the Domain section - ends with
.amazoncognito.com - Client ID: In App Client Information - a long string of random characters
Pro tip: Keep the AWS console open in another tab. You’ll be copying and pasting these values.
Create a .env file in your project root with these values:
PUBLIC_APP_URL=https://localhost:4321
PUBLIC_COGNITO_CLIENT_ID=your_client_id_here
PUBLIC_COGNITO_DOMAIN=https://your-domain.auth.us-east-1.amazoncognito.com
PUBLIC_COGNITO_USER_POOL=https://cognito-idp.us-east-1.amazonaws.com/us-east-1_YourPoolIdImportant: The PUBLIC_ prefix makes these variables available to client-side code in Astro. Other frameworks may expect different prefixes (e.g. NEXTPUBLIC for NextJS, VITE_ for Vite). If you’re using a different framework, adjust the naming convention accordingly.
The Code That Actually Works
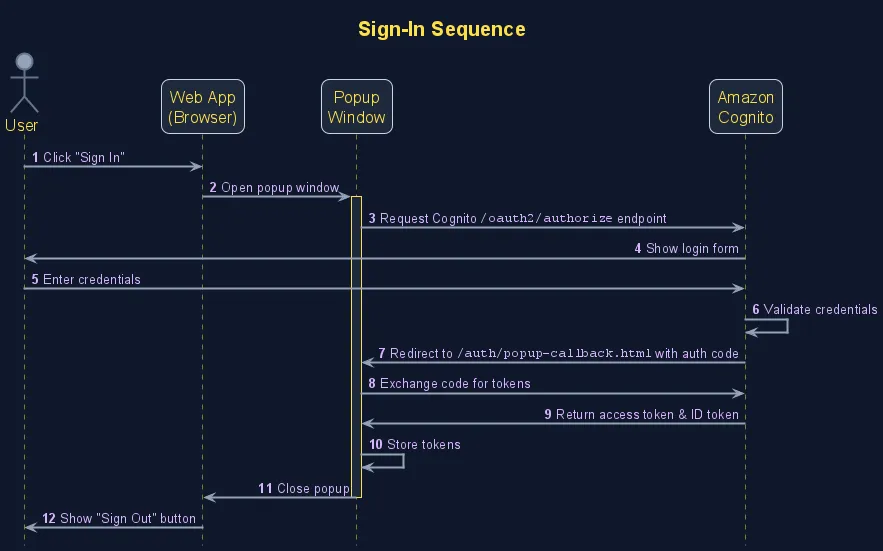
This sequence diagram shows how the login flow works between your app, the popup window, and Cognito. The oidc-client-ts library handles most of this complexity for you.
Now for the implementation. We’re using the oidc-client-ts library because OAuth 2.0 and OpenID Connect have enough edge cases and security considerations to consume weeks of development time. This library handles the protocol complexity so you can focus on your application logic.
First, install the dependency:
npm install oidc-client-tsSetting Up the UserManager (src/hooks/useAuth.ts)
First, let’s configure the UserManager. This is where we tell the library how to talk to Cognito:
import { useState, useEffect } from 'react'
import { UserManager, User } from 'oidc-client-ts'

const userManager = new UserManager({
  authority: import.meta.env.PUBLIC_COGNITO_DOMAIN,
  client_id: import.meta.env.PUBLIC_COGNITO_CLIENT_ID,
  redirect_uri: import.meta.env.PUBLIC_APP_URL + '/auth/popup-callback.html',
  popup_redirect_uri:
    import.meta.env.PUBLIC_APP_URL + '/auth/popup-callback.html',
  popup_post_logout_redirect_uri:
    import.meta.env.PUBLIC_APP_URL + '/auth/popup-logout.html',
  response_type: 'code',
  scope: 'openid email',
  metadata: {
    issuer: import.meta.env.PUBLIC_COGNITO_USER_POOL,
    authorization_endpoint: `${import.meta.env.PUBLIC_COGNITO_DOMAIN}/oauth2/authorize`,
    token_endpoint: `${import.meta.env.PUBLIC_COGNITO_DOMAIN}/oauth2/token`,
    userinfo_endpoint: `${import.meta.env.PUBLIC_COGNITO_DOMAIN}/oauth2/userInfo`,
    jwks_uri: `${import.meta.env.PUBLIC_COGNITO_USER_POOL}/.well-known/jwks.json`,
    end_session_endpoint: `${import.meta.env.PUBLIC_COGNITO_DOMAIN}/logout`,
  },
})
The metadata object here is critical and not immediately obvious. AWS recommends oidc-client-ts, but it has quirks. Without this complete metadata configuration, the library sends requests to the wrong endpoints and fails silently. Most OAuth providers support automatic endpoint discovery, but Cognito requires explicit endpoint configuration.
The Logout Workaround
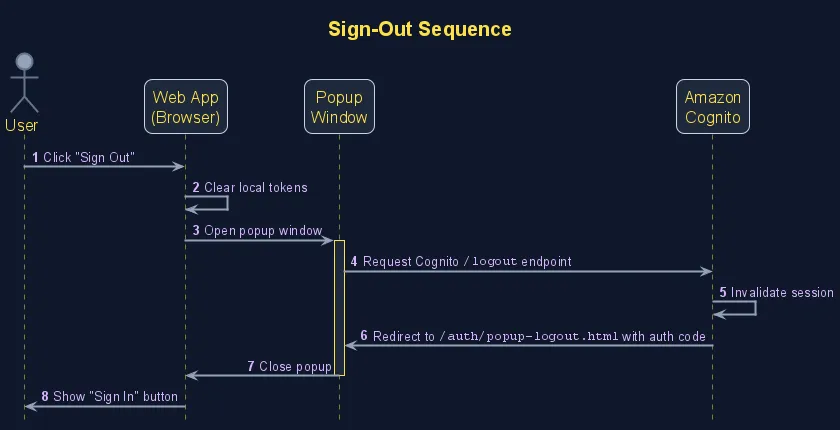
This sequence diagram shows the logout flow. Unlike login, we need a custom implementation because the oidc-client-ts library’s built-in logout doesn’t work properly with Cognito.
This is where oidc-client-ts really frustrated me. The library’s built-in logout never worked the way I wanted - it always redirected users back to the login screen instead of properly logging out. After digging through AWS documentation, I built my own logout flow that directly calls Cognito’s logout endpoint.
The solution is a custom logout function that directly calls Cognito’s logout endpoint, ensuring complete session termination:
const customSignOutPopup = () => {
  const logout_uri = import.meta.env.PUBLIC_APP_URL + '/auth/popup-logout.html'
  const url =
    `${import.meta.env.PUBLIC_COGNITO_DOMAIN}/logout` +
    `?client_id=${import.meta.env.PUBLIC_COGNITO_CLIENT_ID}` +
    `&logout_uri=${encodeURIComponent(logout_uri)}`
  window.open(
    url,
    'logout',
    'popup=true,width=500,height=600,scrollbars=yes,resizable=yes',
  )
}
The useAuth Hook
Now for the main event - our authentication hook. This is where everything comes together:
import { useState, useEffect, useCallback } from 'react'

export function useAuth() {
  const [user, setUser] = useState<User | null>(null)
  const clearUser = async () => {
    setUser(null)
  }

  // Load user from storage on mount
  useEffect(() => {
    userManager.getUser().then(setUser).catch(console.error)

    userManager.events.addUserLoaded(setUser)
    userManager.events.addUserUnloaded(clearUser)

    return () => {
      userManager.events.removeUserLoaded(setUser)
      userManager.events.removeUserUnloaded(clearUser)
    }
  }, [])

  const signin = useCallback(async () => {
    try {
      const user = await userManager.signinPopup()
      setUser(user)
      return user
    } catch (error) {
      console.error('Popup login failed:', error)
      throw error
    }
  }, [])

  const signout = useCallback(async () => {
    try {
      setUser(null)
      await userManager.removeUser()
      customSignOutPopup()
    } catch (error) {
      console.error('Popup logout failed:', error)
      throw error
    }
  }, [])

  return { user, signin, signout, userManager }
}
Why this hook works well:
- Persistent sessions: Authentication state survives browser restarts through localStorage
- Reactive updates: UI automatically reflects authentication changes without manual state management
- Context preservation: Popup-based flow keeps users on the same page instead of redirecting
- Memory management: Event listeners are properly cleaned up to prevent leaks
- Error transparency: Failed authentication attempts are logged for debugging
Putting It All Together
A Simple Login Component (src/components/UserItem.tsx)
Here’s how you’d use the hook in a real component:
import { useAuth } from '../hooks/useAuth.ts'

export const UserItem = () => {
  const { user, signin, signout } = useAuth()

  if (user) {
    return (
      <a
        href="#"
        onClick={(e) => {
          e.preventDefault()
          signout()
        }}
      >
        Sign-Out
      </a>
    )
  }

  return (
    <a
      href="#"
      onClick={(e) => {
        e.preventDefault()
        signin()
      }}
    >
      Sign-In
    </a>
  )
}
The component automatically renders the appropriate action based on authentication state. No complex state management, no manual UI synchronization, no checking token expiration - the hook handles all of that complexity.
The Callback Files (Don’t Forget These!)
These HTML files are required for the OAuth popup flow. They’re minimal but critical - without them, the authentication process will fail silently.
Login Callback (public/auth/popup-callback.html)
This file processes the OAuth callback after successful authentication:
<!DOCTYPE html>
<html>
  <head>
    <title>Login Callback</title>
  </head>
  <body>
    <script src="https://unpkg.com/oidc-client-ts/dist/browser/oidc-client-ts.min.js"></script>
    <script>
      new oidc.UserManager().signinPopupCallback()
    </script>
  </body>
</html>
Logout Callback (public/auth/popup-logout.html)
The logout callback simply closes the popup window, completing the logout flow:
<!DOCTYPE html>
<html>
  <head>
    <title>Logout Callback</title>
  </head>
  <body>
    <script>
      window.close()
    </script>
  </body>
</html>
Key Takeaways
Start minimal, iterate intelligently: Get basic authentication working before diving into advanced features like MFA or custom attributes. Cognito’s feature set can be overwhelming, but core login/logout is surprisingly straightforward once configured correctly.
SES approval is a deployment blocker: Request production access during development, not right before launch. The approval process typically takes 24-48 hours and requires thoughtful responses about your email practices.
Popup flow preserves user context: Unlike redirect-based authentication, popups keep users on the same page, maintaining their application state and improving the overall experience.
Configuration belongs in environment variables: Hard-coded values make deployments fragile. Externalize all Cognito configuration to support multiple environments seamlessly.
Test beyond the happy path: Use different email providers, test with expired tokens, and verify behavior when users close popups mid-flow. Authentication edge cases have a way of surfacing at the worst possible moments.
Monitor authentication metrics: Set up CloudWatch dashboards for login success rates, failed attempts, and token refresh patterns.
Token Refresh
This implementation covers the core authentication flow, but there’s one important piece missing: automatic token refresh. Understanding token lifecycle is crucial for production applications.
How Token Expiration Works
By default, Cognito access tokens expire after 1 hour. This is a security feature - shorter-lived tokens reduce the window of vulnerability if they’re compromised. However, it creates a user experience problem: without automatic refresh, users get kicked out mid-session and have to log in again.
When a token expires, API calls start failing with 401 Unauthorized errors. Users might be in the middle of filling out a form or browsing your app when suddenly they’re treated as unauthenticated. This is jarring and frustrating.
Silent Token Refresh
The solution is “silent refresh” - automatically getting new tokens before the old ones expire, without interrupting the user’s workflow. The oidc-client-ts library handles this elegantly through event listeners.
Here’s how it works:
- The library monitors token expiration times
- About 5 minutes before expiration, it fires an
AccessTokenExpiringevent - We handle this event by calling
signinSilent(), which uses the refresh token to get new access tokens - The process happens invisibly - users never know their tokens were refreshed
Implementation
We just need to update the useEffect() call in our useAuth hook:
// Load user from storage on mount
useEffect(() => {
  userManager.getUser().then(setUser).catch(console.error)

  const handleTokenExpiring = () => {
    userManager.signinSilent().catch(console.error)
  }

  userManager.events.addUserLoaded(setUser)
  userManager.events.addAccessTokenExpiring(handleTokenExpiring)
  userManager.events.addUserUnloaded(clearUser)

  return () => {
    userManager.events.removeUserLoaded(setUser)
    userManager.events.removeAccessTokenExpiring(handleTokenExpiring)
    userManager.events.removeUserUnloaded(clearUser)
  }
}, [])
What Happens When Refresh Fails
Silent refresh can fail for several reasons:
- The refresh token itself has expired (typically after 5 days of inactivity)
- The user’s account has been disabled
- Network connectivity issues
- Cognito service problems
When signinSilent() fails, the user will need to log in again manually. The catch(console.error) logs the failure for debugging, but doesn’t disrupt the user experience - they’ll simply see the login button appear again.
This graceful degradation is exactly what you want: automatic refresh when possible, manual login when necessary.
Wrapping Up
You now have a production-ready authentication system that handles the security complexities while staying out of your way. Cognito has its learning curve and occasional quirks, but it delivers on the promise of scalable, secure authentication without requiring deep security expertise.
The real value proposition is operational simplicity - this setup scales from your first user to millions without infrastructure changes, compliance concerns, or security updates. You get enterprise-grade authentication while focusing your energy on features that differentiate your application.
I deployed this exact setup using AWS Amplify - just added the environment variables to the server configuration and everything worked smoothly. With this authentication foundation solid, you can confidently build user-specific features, knowing your auth system will scale with your ambitions rather than constraining them.
References
- Amazon Cognito User Pools
- oidc-client-ts
- Development Server Configuration - Transform your localhost setup with network access for mobile testing and HTTPS certificates for API integrations. Complete guide for Vite and Astro developers.