
Development Server Configuration
Transform your localhost setup with network access for mobile testing and HTTPS certificates for API integrations. Complete guide for Vite and Astro developers.
August 9, 2025

Overview
The default localhost setup works great for basic development, but you’ll quickly hit walls in real scenarios. While many services work fine with HTTP in development, some third-party integrations and modern web APIs require HTTPS for security reasons. The error messages can be frustratingly vague when this happens.
Then there’s testing responsive designs on actual phones, which is impossible when your server only accepts localhost connections. These aren’t edge cases - they’re common development needs that the default setup can’t handle.
I’ll walk you through the essential server configurations that solve these problems for Vite and Astro projects.
Testing on Mobile Devices
One of the most valuable development techniques is testing your app on real devices without deploying. This is essential for responsive design validation and mobile-specific debugging. The solution is simpler than you might think - we just need to configure the server to accept connections from your local network.
Step 1: Configure Network Access
By default, development servers bind to 127.0.0.1 (localhost), which only accepts connections from the same machine. To allow connections from other devices on your network, we need to bind to 0.0.0.0, which tells the server to accept connections from any network interface.
Update your framework’s configuration file with the following settings:
For Vite (vite.config.js):
export default {
  server: {
    host: '0.0.0.0',
  },
}
For Astro (astro.config.mjs):
import { defineConfig } from 'astro/config'

export default defineConfig({
  server: {
    host: '0.0.0.0',
  },
})
Step 2: Access from Mobile Devices
When you start your development server, you’ll see both local and network URLs in the terminal:
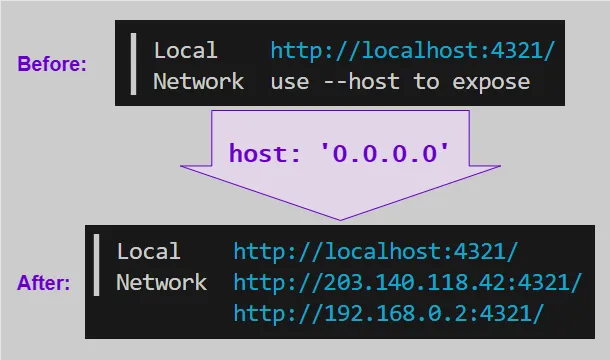
The Network URL is what you’ll use on your mobile device. Ensure your phone is connected to the same Wi-Fi network, then navigate to that Network URL in your mobile browser.
Common Issues and Quick Fixes
Can’t access from phone?
- Check that both devices are on the same WiFi network
- Try temporarily disabling your computer’s firewall
- Look for the Network URL in your terminal output
Port conflicts?
- If the default port is unavailable, the server will use an alternative port automatically
- Check your terminal output for the actual port being used
Network isolation?
- Some public/corporate networks prevent device-to-device communication
- Try using a personal hotspot or home network for testing
This setup enables real-time testing across multiple devices simultaneously.
Understanding HTTPS and Certificates
Before diving into setup, let’s understand why HTTPS matters in development. HTTPS encrypts data between your browser and server, preventing others from intercepting sensitive information like passwords or API keys. Many services (like Google OAuth and payment processors) require this encryption even during development.
Certificates are digital documents that prove your server’s identity. Think of them like a driver’s license for websites - they verify that the server you’re connecting to is legitimate. In production, trusted Certificate Authorities (like Let’s Encrypt) issue these certificates. For development, we create our own.
Self-Signed Certificates
Self-signed certificates provide a quick solution for enabling HTTPS on your local development server. While browsers will show security warnings (because they don’t recognize your homemade certificate), the encrypted connection works perfectly for testing integrations.
PROS:
- Setting it up is simple.
- Amazon services can redirect to a URL that uses
HTTPS.
CONS:
- The certificate is not trusted.
- Your browser will warn you that you have an invalid Certificate Authority (CA).
Step 1: Generate Certificate Files
First, create a dedicated directory for your certificates:
mkdir certs
cd certs
Generate the self-signed certificate using OpenSSL:
openssl req -x509 -newkey rsa:2048 -nodes -keyout key.pem -out cert.pem -days 365 -subj "/CN=localhost"This creates two files:
key.pem: The private keycert.pem: The certificate
Security note: Always exclude certificates from version control by adding this to your .gitignore:
certs/Step 2: Configure the Vite HTTPS Server
For Vite (vite.config.js):
import fs from 'node:fs'

export default {
  server: {
    https: {
      key: fs.readFileSync('./certs/key.pem'),
      cert: fs.readFileSync('./certs/cert.pem'),
    },
  },
}
For Astro (astro.config.mjs):
import { defineConfig } from 'astro/config'
import fs from 'node:fs'

export default defineConfig({
  vite: {
    server: {
      https: {
        key: fs.readFileSync('./certs/key.pem'),
        cert: fs.readFileSync('./certs/cert.pem'),
      },
    },
  },
})
Step 3: Handle Browser Security Warnings
When you first visit your HTTPS localhost URL, browsers will display security warnings because they don’t recognize your self-signed certificate. This is expected behavior.
To proceed:
- Click “Advanced” or “Show details”
- Select “Proceed to localhost” or “Continue to site”
Note: You may need to clear your browser cache if you’ve previously visited the site with different certificate settings.
While browsers will show the connection as “Not Secure,” the HTTPS encryption is functional. Most APIs and OAuth providers will accept these connections for development purposes.
Why HTTPS Matters in Development
Many modern services require HTTPS even during development - OAuth providers, payment processors, geolocation APIs, and secure cookie features all depend on encrypted connections. I discovered this when building an authentication system that simply wouldn’t work over HTTP, with only vague error messages as clues.
With HTTPS enabled locally, you can test these integrations properly without deploying. Whether it’s setting up social login, testing payment flows, or debugging secure features, having https://localhost available eliminates a whole category of development friction.
Local Certificate Authority
For a more seamless development experience, you can create a local Certificate Authority (CA) that your browser will trust. This eliminates security warnings while maintaining proper HTTPS encryption. The mkcert tool makes this process straightforward.
PROS:
- The browser will believe it is a trusted certificate.
CONS:
- The browser still detects that something is not quite right. Chrome shows the web page as “Not secure”.
- Certificate is only for one address (e.g.
localhost). If you set it up forlocalhostand you want to view the web app on your phone, it will not be certified by the Certificate Authority.
Step 1: Install and Configure mkcert
Install mkcert using your system’s package manager:
Windows (Chocolatey):
choco install mkcertWindows (Scoop):
scoop bucket add extras
scoop install mkcert
macOS (Homebrew):
brew install mkcertLinux (Ubuntu/Debian):
sudo apt install libnss3-tools
wget -O mkcert https://github.com/FiloSottile/mkcert/releases/latest/download/mkcert-v*-linux-amd64
chmod +x mkcert
sudo mv mkcert /usr/local/bin/
After installation, create and install your local Certificate Authority:
mkcert -installNote: This command requires administrator privileges. Run your terminal as administrator on Windows, or use sudo on macOS/Linux if prompted.
Troubleshooting: If the installation fails, check that your antivirus isn’t blocking the operation, or try restarting your terminal with elevated privileges.
Step 2: Create Localhost Certificate
Change into the certs folder and run the following.
mkcert localhostThis will create localhost-key.pem and localhost.pem files in your certs folder.
Step 3: Update Vite Configuration
Now update your configuration to use the new localhost certificate.
For Vite (vite.config.js):
import fs from 'node:fs'

export default {
  server: {
    https: {
      key: fs.readFileSync('./certs/localhost-key.pem'),
      cert: fs.readFileSync('./certs/localhost.pem'),
    },
  },
}
For Astro (astro.config.mjs):
import { defineConfig } from 'astro/config'
import fs from 'node:fs'

export default defineConfig({
  vite: {
    server: {
      https: {
        key: fs.readFileSync('./certs/localhost-key.pem'),
        cert: fs.readFileSync('./certs/localhost.pem'),
      },
    },
  },
})
Step 4: Verify Trusted Connection
With your local CA installed and certificates generated, your browser should now trust your localhost HTTPS connection:
- No security warnings when accessing your site
- Clean HTTPS indicator in the address bar
- Proper SSL/TLS encryption for development
Note: Some browsers may still show “Not Secure” for localhost connections as a general security measure, but the certificate validation will work correctly. If you continue seeing warnings, try restarting your browser or clearing the certificate cache.
Production Considerations
These certificates are for development only! When you deploy to production, your hosting provider handles SSL certificates properly. Using development certificates in production would be like wearing pajamas to a job interview - technically possible, but not a great idea.
That’s why we use conditional logic to only enable certificates during development. If your server starts acting up, double-check that this condition is working correctly.
For Vite (vite.config.js):
import fs from 'node:fs'

export default {
  ...(process.argv.includes('dev') && {
    server: {
      https: {
        key: fs.readFileSync('./certs/key.pem'),
        cert: fs.readFileSync('./certs/cert.pem'),
      },
    },
  }),
}
For Astro (astro.config.mjs):
import { defineConfig } from 'astro/config'
import fs from 'node:fs'

export default defineConfig({
  ...(process.argv.includes('dev') && {
    vite: {
      server: {
        https: {
          key: fs.readFileSync('./certs/key.pem'),
          cert: fs.readFileSync('./certs/cert.pem'),
        },
      },
    },
  }),
})
What You’ve Unlocked
These development server configurations solve common workflow challenges:
- Network access enables real device testing without deployment
- Self-signed certificates provide quick HTTPS for API integrations
- Local CA setup eliminates browser warnings for smoother development
With these tweaks, you can now test your web apps on your actual phone and work with secure HTTPS connections locally. Instead of deploying to test on mobile or struggling with third-party service integrations, you can develop and debug more effectively right from your local machine.
Your development workflow just got an upgrade!
References
Related Articles
- Vite Server Configuration - Official documentation for Vite server options
- mkcert Documentation - Local certificate authority tool
Other Articles
- Building My Blog with Astro - My experience choosing and building a blog with Astro. Why Astro’s features made it the clear choice over other static site generators, and what the actual development process was like.
- Adding User Authentication - Next steps for implementing secure login systems