
Building My Blog with Astro
My experience choosing and building a blog with Astro. Why Astro's features made it the clear choice over other static site generators, and what the actual development process was like.
July 15, 2025

Introduction
After deciding to build a proper developer blog, I found myself staring at the usual framework decision paralysis. There are tons of options out there, each with their own trade-offs and learning curves. Rather than dive headfirst into the most popular choice, I took some time to research what would actually work best for my specific needs.
This is the story of why I chose Astro and what the actual development experience was like. Spoiler alert: it was refreshingly straightforward.
The Framework Evaluation Process
Let’s be honest - there are tons of frameworks for building blogs these days. I spent time researching the usual suspects (Next.js, Gatsby, you know the drill), reading documentation, and comparing feature sets. Astro’s features just clicked for me:
What made Astro stand out on paper:
- Markdown and MDX support: Write in Markdown, add React components when needed
- React + Tailwind integration: My comfort zone tools, no learning curve
- Island architecture: Fast by default, JavaScript only where you need it
- TypeScript first: Catches my mistakes before they become problems
- Zero config SSG: Works out of the box, no webpack nightmares
The deciding factors:
While Next.js and Gatsby are proven solutions, they felt like overkill for a content-focused blog. Astro’s “HTML-first” approach and the promise of shipping zero JavaScript by default was exactly what I wanted for a fast-loading blog.
The Learning Path That Actually Works
Here’s my advice: start with Astro’s Build a Blog tutorial. I know, I know - tutorials can be boring. But this one actually teaches you how Astro thinks, not just how to copy-paste code.
Why this tutorial is different:
- It covers the core concepts (components, layouts, content collections)
- Shows you when to use
.astrovs.tsxfiles - Explains Content Collections configuration step-by-step
- Builds something you’ll actually use
Time investment: It took me about 2 hours to work through, and by the end I had a solid grasp of the core concepts. Time well spent.
The full development timeline: As someone completely new to web development (this is my first website), the entire blog took me about 10 hours from tutorial completion to having something I was ready to publish. That includes learning CSS layouts, figuring out TypeScript, and getting comfortable with Astro’s patterns.
What the tutorial gets right: Instead of just showing you syntax, it explains the “why” behind Astro’s design decisions. This foundation made everything else click into place.
The Development Reality Check
I went into this expecting the usual framework learning curve - you know, that week of banging your head against the wall while everything breaks in mysterious ways.
Instead? Astro just worked.
What was genuinely smooth:
- Setting up the project structure
- Understanding when to use
.astrovs.tsxfiles (thanks to the tutorial) - Configuring Content Collections (also straightforward after the tutorial)
- Static site generation worked out of the box
- Adding interactive React components was straightforward
What actually challenged me:
My biggest challenges weren’t even Astro-related - they were me wrestling with CSS layouts and TypeScript generics. Classic newbie developer problems, not framework problems.
The documentation factor: The documentation is actually good (shocking, I know). Clear examples, good explanations, and it covers the edge cases you actually encounter.
A Look at Astro Code in Action
Here’s an example of how layouts work in Astro, showcasing both props and slots:
---
// src/layouts/BaseLayout.astro
export interface Props {
  title: string
  description?: string
  showNavigation?: boolean
}

const { title, description, showNavigation = true } = Astro.props
---

<!doctype html>
<html lang="en">
  <head>
    <meta charset="UTF-8" />
    <meta name="viewport" content="width=device-width, initial-scale=1.0" />
    <title>{title}</title>
    {description && <meta name="description" content={description} />}
  </head>
  <body>
    <header>
      <h1>{title}</h1>
      {
        showNavigation && (
          <nav>
            <a href="/">Home</a>
            <a href="/about">About</a>
          </nav>
        )
      }
    </header>

    <main>
      <slot />
    </main>

    <footer>
      <slot name="footer">
        <p>© 2024 My Blog</p>
      </slot>
    </footer>
  </body>
</html>
Note: Props validation is omitted here for readability - production code should always validate required props.
Usage example:
---
// src/pages/blog-post.astro
import BaseLayout from '../layouts/BaseLayout.astro'
---

<BaseLayout
  title="My First Post"
  description="Learning Astro's layout system"
  showNavigation={false}
>
  <article>
    <p>This content goes into the default slot.</p>
  </article>

  <div slot="footer">
    <p>Custom footer for this post</p>
    <p>Published: January 2024</p>
  </div>
</BaseLayout>
This example demonstrates:
- Props with types:
title,description,showNavigation - Default values:
showNavigation = true - Conditional rendering: Navigation only shows when enabled
- Default slot: Main content area
- Named slots: Custom footer with fallback content
Understanding Astro’s Island Architecture
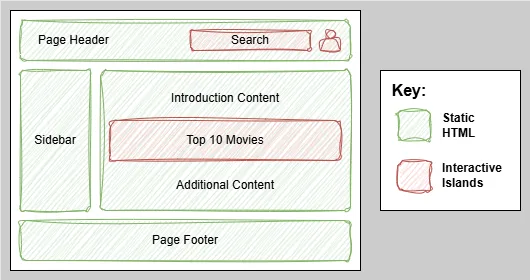
Example Page Layout
One of Astro’s key innovations is its “island architecture.” Think of your page as an ocean of static HTML with small “islands” of interactivity where you actually need JavaScript. The interactive islands can be nested at any level on the page. The example below shows three interactive islands for 1) The user login, 2) a search box, and 3) a presentation of the current top 10 current movies. The rest of the web page consists of static HTML elements.
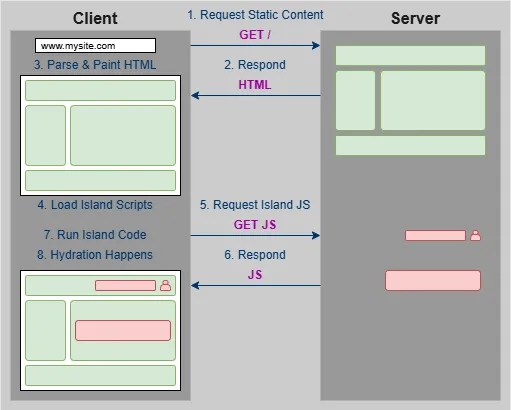
How it works in practice
- Client requests static content from the server (e.g. GET /).
- Server responds with pre-rendered HTML (static, from SSG).
- Browser parses & paints HTML (non-interactive content shows immediately).
- Browser sees script tags for islands.
- Browser requests those JS files.
- Server responds with JS chunks for the islands.
- Browser executes the JS (island code runs in the client).
- Hydration happens: event listeners + state are wired up, making the islands interactive.
This approach means you get the performance benefits of static sites with the flexibility of modern frameworks exactly where you need it.
Performance Results That Matter
The whole experience felt… smooth. Here’s what impressed me most:
✅ Fast builds: Development server starts quickly, hot reload works reliably
✅ SEO optimizations: Built-in support for meta tags, sitemaps, and structured data
✅ Performance: Lighthouse scores are excellent without any manual optimization
✅ Type safety: Full TypeScript support for both code and content frontmatter
✅ Flexibility: Easy to add interactive components exactly where you need them
Lighthouse Performance Scores
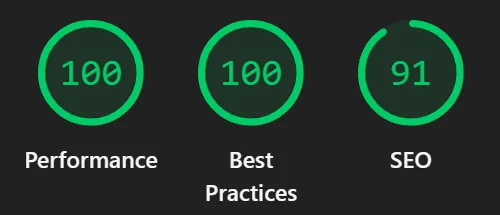
One of the most compelling reasons to choose Astro is the performance you get out of the box. Here are the actual Lighthouse scores for my homepage:
Desktop Performance:
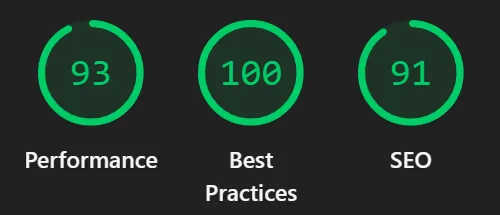
Mobile Performance:
What drives these scores:
- Zero JavaScript by default: Pages load as pure HTML
- Optimized images: Automatic WebP conversion and responsive sizing
- Minimal CSS: Only the styles you actually use get included
- Fast server response: Static files served from CDN
Note: The SEO score reflects the baseline before adding structured data, meta descriptions, and other SEO optimizations. With proper SEO implementation, you can easily change that 91 to 100 for both desktop and mobile.
These aren’t cherry-picked results - this is what you get with a standard Astro setup. No performance optimization required.
Ready to Try Astro?
If you’re considering Astro for your next project, here’s what I’d recommend:
Start with the basics: Work through Astro’s Build a Blog tutorial. It’s genuinely well-designed and will give you the foundation you need.
Experiment with layouts: Create a simple layout component using props and slots. The pattern becomes intuitive quickly, and you’ll appreciate how clean the separation of concerns feels.
Add one interactive island: Pick a small piece of functionality - maybe a theme toggle or a simple form - and implement it as an island. You’ll be surprised how straightforward it is to add interactivity exactly where you need it.
The combination of familiar tools, excellent performance, and thoughtful architecture makes Astro a compelling choice for content-focused sites. Whether you’re building a blog, documentation site, or marketing pages, it’s worth exploring what Astro can do for your next project.rs and build from there.
The Bottom Line
If you’re looking for a blog framework that gets out of your way and lets you focus on writing, Astro’s worth serious consideration. The learning curve is gentle, the documentation is excellent, and the performance benefits are real.
For a web development newcomer, I was surprised how quickly I went from tutorial to production-ready blog. The framework’s thoughtful design decisions become apparent as you use it.
You’re reading this article on the very blog I built following this process - proof that Astro delivers on its promises for real-world projects.
References and Further Reading
Official Documentation:
Related Articles:
- Development Server Configuration - Transform your localhost setup with network access for mobile testing and HTTPS certificates for API integrations. Complete guide for Vite and Astro developers.
- How I Finally Got Login Right - Add user authentication to your Astro site with Amazon Cognito
Performance and Best Practices: